Have you ever seen Catwoman?
It’s an arguably cheesy 2004 spin-off of the Batman film series featuring Halle Berry playing an ordinary woman who gains cat-like powers after running into some trouble. At one point, Halle Berry’s character, who has probably never ridden a motorcycle before in her life, jumps on a random Ducati Monster and immediately rips through the streets, maneuvering the bike like a pro. Her instant mastery of the motorcycle may seem normal to viewers who have never been on a motorcycle, but any experienced rider would scoff at the absurdity of this very inaccurate portrayal.
As much as Hollywood movies would like us to believe otherwise, motorcycle riding is not as easy as you think. It requires a lot of knowledge, preparation, and concentration. You have to know what you’re doing, prepare your bike before each trip, and ride with the utmost alertness. When it comes to motorcycle riding, safety is always number one. Motorcycle riding is a high-risk activity where a small accident could cost you your life, so it would be wise to ensure your own safety as much as possible on the road.
We’re here to clue you in on the basics of handling a motorcycle and protecting yourself on the road. Whether you’re a novice or an experienced rider, the following crash course will teach you all about motorcycle riding or refresh your memory on safety tips, respectively.
What to wear
Before you go for a ride, be sure to put on the following safety gear and articles of clothing that will protect you on the road:
A helmet
Did you know that motorcyclists not wearing a helmet are 40% more likely to die in a crash than those who wear head protection? If there’s something that can save your life during a spill, it’s a helmet. Actually, it is so useful that some states have implemented laws requiring motorcyclists to wear helmets at all times.
A jacket with padding and reflectors
What you wear while riding matters a lot. Have you ever wondered why a lot of motorcyclists wear leather jackets or mesh jackets? It’s because leather and mesh are very sturdy and wind-resistant materials that will protect your skin when they come in contact with asphalt in the case of a spill. Natural fibers like cotton and wool will be more likely to rip and subject your skin to cuts and asphalt burns.
While a padded jacket or body armor won’t keep you completely safe, it will add protection in case of a crash. If your jacket has reflectors (or at least reflective tape or patches), other motorists will be able to see you better at nighttime.
Sturdy over-the-ankle boots
You want to wear boots that cover your ankles. Your ankles are fragile, so you need to protect them as much as possible in case of a crash. While your boots have to be sturdy, they have to be comfortable as well. You’re going to be using your feet while motorcycle riding, so it’s important for you to be able to move them around.
Jeans or leather pants
When you ride a standard motorcycle, your right calf will be situated very close to the exhaust pipe. If you’re wearing shorts or even pants made out of thin fabric, the exhaust pipe can burn your skin. You want to wear jeans or leather pants. If the weather’s too cold for your liking, consider wearing chaps as well.
A pair of glasses
It’s nearly impossible to ride without wearing glasses! All the wind would get into your eyes, and you wouldn’t be able to see anything. During the day, you can wear sunglasses. At nighttime, you can wear clear glasses. A pair of safety glasses from a hardware store would do the trick.
Safety precautions
The last thing you want is to get stranded on the road, or even worse, take a spill just because you didn’t take five minutes to perform a pre-check before taking your bike out on the road. The Motorcycle Safety Foundation came up with the acronym T-CLOCK to help you remember what to check: tires, controls, lights, oil, chassis, and kickstand.
With that in mind, here are the steps you need to take during your pre-check:
Check the tire pressure.
Even the smallest change in the tire pressure can cause drastic changes in the handling and riding quality of the motorcycle. Look at your owner’s manual or call the tire manufacturer’s hotline to find out the recommended PSI levels. Also, always check the tire pressure when the tires are cool in temperature.
Ensure that the tires don’t have any dry rot.
When the bike is in motion, its tires warm up, which will change the density and pressure of the air inside. If there’s any dry rot, the tires will blow up after being subjected to the changes. Wondering what dry rot looks like? Take a look at this picture: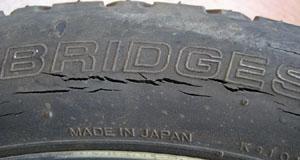
If you have spokes, make sure none of them are loose.
A loose spoke leads to an unbalanced tire, which can blow up over time. Tap each spoke with a wrench and listen to the sound it makes. If it makes a ping sound, it’s tight. If there’s no ping sound, the spoke is probably loose. Tighten any loose spokes until they all make a similar sound when tapped.
Test the brakes, clutch, and throttle.
Without properly functioning controls, you can end up on the side of the road. Prevent this from happening simply by ensuring that the levers and cables are in good shape. Press the front brake and move your bike forward. If the brake feels firm and if the front wheel doesn’t move, it’s good. Repeat with the rear brake. Squeeze the clutch and if it feels smooth, it’s fine. Repeat with the throttle.
Test the turn signals, brake lights, and headlights.
You want to make sure all the lights are working so you can communicate with other motorists on the road if needed. This step is imperative to your safety, so don’t skip it.
Check the oil and fuel.
If your bike is low on oil, your engine can blow up. If there’s not enough oil, add some more. Next, look at the gas level in the tank and ensure that your fuel petcock isn’t on “reserve”.
Look for any loose debris in the chain and/or the belt.
Make sure there’s no loose debris (like rocks, sticks, or anything that can get stuck in there). Anything that gets caught in the chain or the belt can wreck the wheels and/or the transmission… and set you back a pretty penny!
Ensure that the chain and/or belt aren’t too loose or too tight.
Put your hand under the chain or belt and gently push it upwards. If it doesn’t move at all, it’s too tight. If it moves more than an inch, it’s too loose. If it’s too loose or too tight, it can blow your transmission. Make the necessary adjustments before putting the motorcycle into motion.
Make sure nothing is leaking.
If something is leaking, fix the problem or have it looked at by a mechanic before taking the motorcycle out for a spin.
Check the kickstand.
The kickstand is what keeps your motorcycle off the ground. Make sure it’s not bent or cracked.
Once you have everything checked (and adjusted if necessary), you’ll have the peace of mind that your motorcycle is in tip-top shape and is safe to ride.
Starting your motorcycle
Motorcycles are not like cars at all. You can’t just get on, turn the ignition, and then zoom off. Starting a motorcycle requires a series of steps. The Motorcycle Safety Foundation came up with the acronym FINE-C to help you remember the proper steps to start your motorcycle: fuel, ignition, neutral, engine, and choke/clutch.
- Turn the FUEL valve on.
- Turn the IGNITION.
- Make sure the motorcycle is in NEUTRAL (check if the neutral light is on).
- Run the ENGINE (put the switch in the run/on position).
- Adjust the CHOKE until the engine is running smoothly.
- Squeeze the CLUTCH before putting your motorcycle into first gear.
… And now you’re good to go!
Shifting gears
Motorcycles are not scooters. They are manual transmission vehicles that require a lot of shifting. A lot of novice riders find shifting gears to be one of the most challenging aspects of motorcycle riding. However, once you have it down pat, you’ll be able to do it effortlessly.
You see that lever by your left foot? That’s the gear selector. You use it to shift gears. If you push it all the way down with your foot, your motorcycle goes into first gear. From that point, gently lifting the lever with your foot will put your bike into neutral. From neutral, lifting the lever again (which will produce a clicking sound) puts your bike into second gear. Repeat, and you’re in third gear. Repeat, and you’re in fourth gear. If you’re on the road and if you want to get from first to second gear, firmly lift the lever. Doing it too gently will put your bike in neutral.
When to shift gears
Listen to the motorcycle, and feel the engine. A smooth and purring engine means you’re going the right speed in the right gear. If the engine starts grinding and emitting a whining sound, it’s time to shift up to make your engine accommodate the increased speed. If your engine starts to give off a low, rumbling sound and if your motorcycle starts to jerk forward a little bit, you’re going too slow for the gear you’ve selected. Immediately shift down to avoid stalling your engine.
What happens if you don’t shift gears?
If you constantly over-rev your engine (which basically means going faster than your engine can handle) the engine will eventually blow up. If you ride too slow for the gear you’ve selected, your engine will stall and possibly put you in danger, especially if you’re on a busy street.
How to shift gears
Here’s how to shift gears when your motorcycle’s already in full motion on the road:
- Push the throttle forward until the engine stops revving.
- Squeeze the clutch to disengage the engine.
- Downshift or upshift with your left foot.
- Let go of the clutch and slowly accelerate the throttle until you reach a comfortable speed.
The only exception to this is when you’re moving from a complete stop in first gear. Let’s say you’re sitting at a stoplight (with your motorcycle in neutral). Once the light turns green, do the following:
- Squeeze the clutch.
- Put your bike in first gear.
- Slowly loosen your grip on the clutch until your motorcycle moves on its own (this is called the friction zone). NEVER completely let go of your clutch when doing this.
- Rev the throttle while releasing the clutch. Keep it smooth and gradual; don’t completely release the clutch until the throttle is fully revved.
This takes a lot of practice to master, so be patient and don’t become frustrated every time your engine stalls! You can practice this move in a parking lot or someplace without many cars around.
Turning
Another tricky aspect of motorcycle riding is turning. Everything your driver’s ed teacher in high school ever taught you about steering does not apply here. Instead, you use your weight to turn the motorcycle, so you always have to keep your handlebars straight while turning. If you’re going left, slightly push your left grip in order to keep your motorcycle straight. If you’re going right, slightly push your right grip. Rather than watching the road right in front of you, always keep your eye on where your motorcycle will end up after the turn is completed. It may seem awkward for you to do at first, but it really helps ensure a smooth turn.
Taking a turn on your motorcycle requires a lot of practice. Don’t rush into it; always start slow and gradually ease into the harder turns whenever you feel confident enough.
Additional motorcycle riding tips
- If you run out of gas, put your fuel valve in reserve. It should give you enough gas to last another 20 miles.
- If you have to come to a quick stop, make sure your bike is straight.
- Don’t trust any other motorists on the road. They’re not looking out for you. Sometimes they can’t see you or hear you. You’re the only one who can ensure your own safety.
- Reset the tripmeter every time you fill up your gas tank.
Most of all, always remember that safety is number one!